Publisher Profile
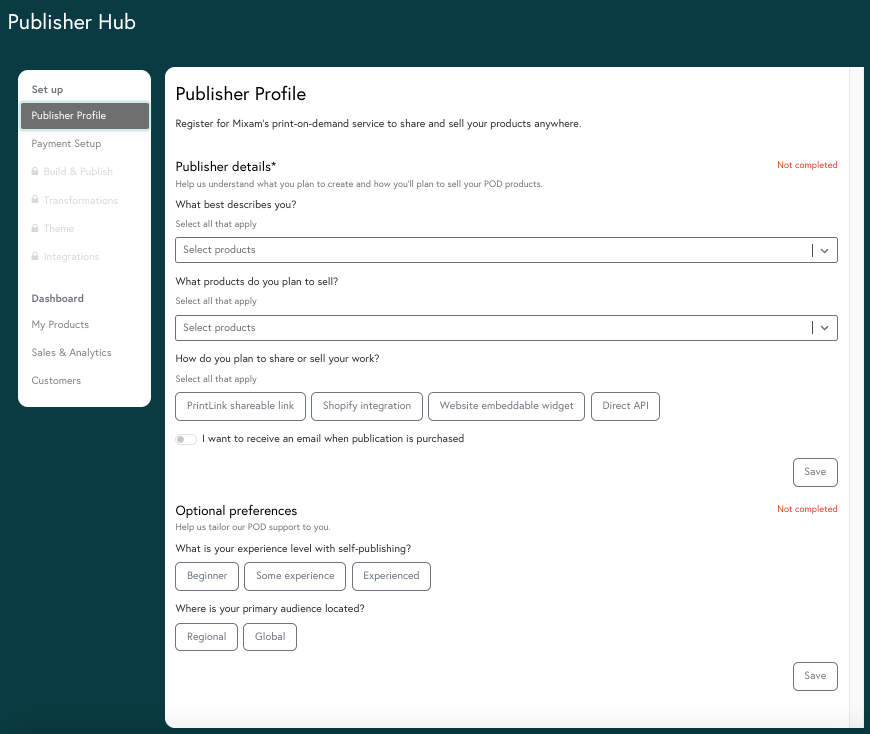
Pre-registration - a required form is presented.
- Publisher Details: Mandatory information we require to register you as a publisher. Your selections here may influence whether you receive information on products or updates for each sales channel in the future. You will automatically receive an email notification every time a customer purchases your print-on-demand product via Mixam or an integration. You can turn off email notifications using the toggle button.
- Optional Preferences: these are useful indications for our team to tailor your support and understand your target audience.
These preferences can be updated at any time by clicking ‘update preferences’ on the Publisher Profile tab.
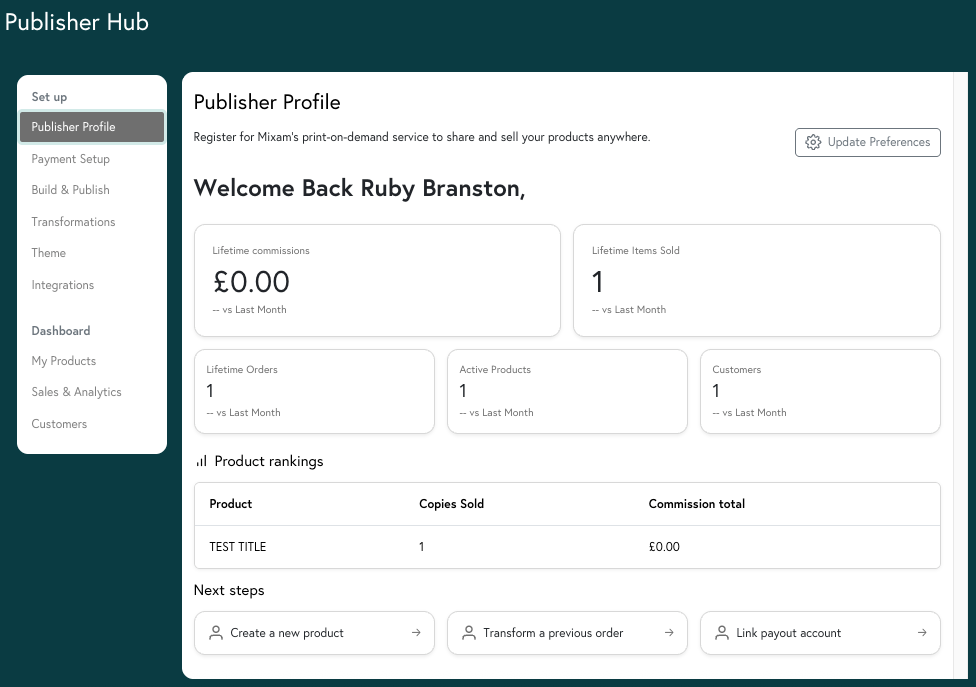
Post-registration - a welcome summary of your Print-On-Demand statistics is displayed.
- Lifetime Commissions: total all-time cumulative profit earnings across all sales channels
- Lifetime Items Sold: total all-time number of items sold across all sales channels
- Lifetime Orders: total all-time number of orders placed, including all single-item and multi-item orders across all sales channels
- Active Products: the current number of products set to active which are available for purchase
- Customers: the current number of customers that have opted in to share their details with you for marketing purposes
Product rankings
- Copies Sold: total all-time number of sales each item has had across all sales avenues
- Commission Total: total all-time commission earned from the number of products sold based on pricing strategy and production cost fluctuation.
Payment Setup
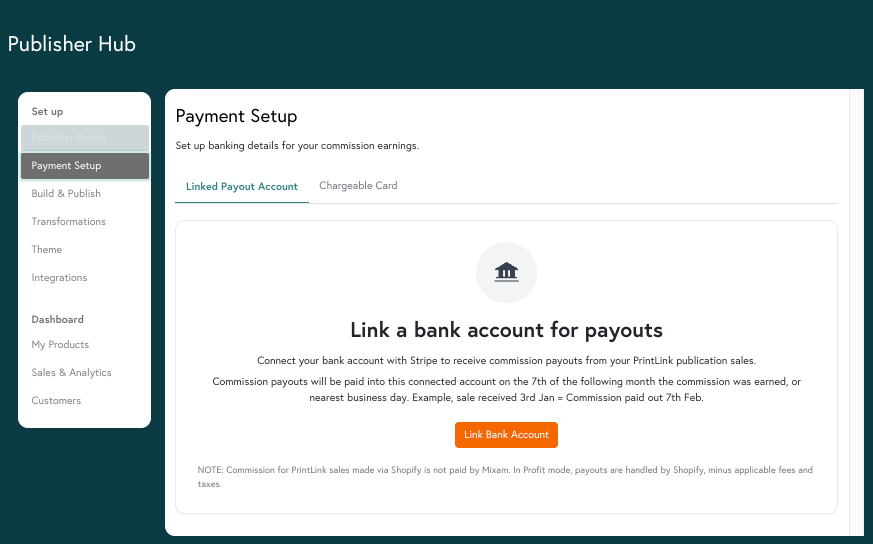
Linked Payout Account
This tab allows you to connect your bank account to Stripe so Mixam can pay you your commissions.
How to Link your bank account
- Go to your Publisher Hub
- Click the ‘Payment Setup’ tab
- Click the ‘Linked Payout Account tab
- Click the ‘Link Bank Account’ button
- Follow the on-screen instructions to complete your registration with Stripe.
Once connected, it will show details such as your bank’s name, currency, country, and the last few digits of your account number. The ‘Payment Dashboard’ button will direct you to your Stripe dashboard, here you can edit your payout details anytime and view past and upcoming payouts. This step is mandatory to begin selling.
Chargeable Card
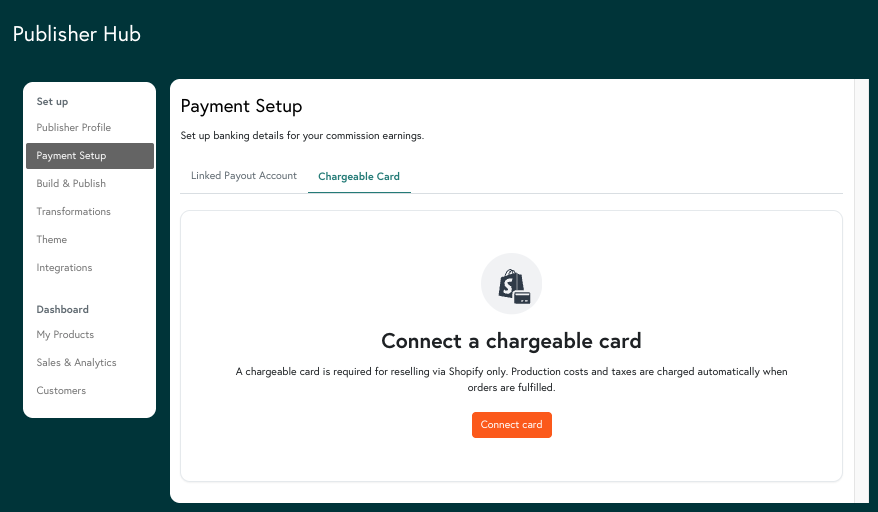
This tab is for adding a card on file for automated product charges to support Shopify orders.
How to add a chargeable card
- Go to your Publisher Hub
- Click the ‘Payment Setup’ tab
- Click the ‘Chargeable Card’ tab
- Click the ‘Connect card’ button to add a default card
- Follow the on-screen instructions from Stripe.
You can add as many cards as you like, these will be listed as ‘saved cards’.
Build & Publish
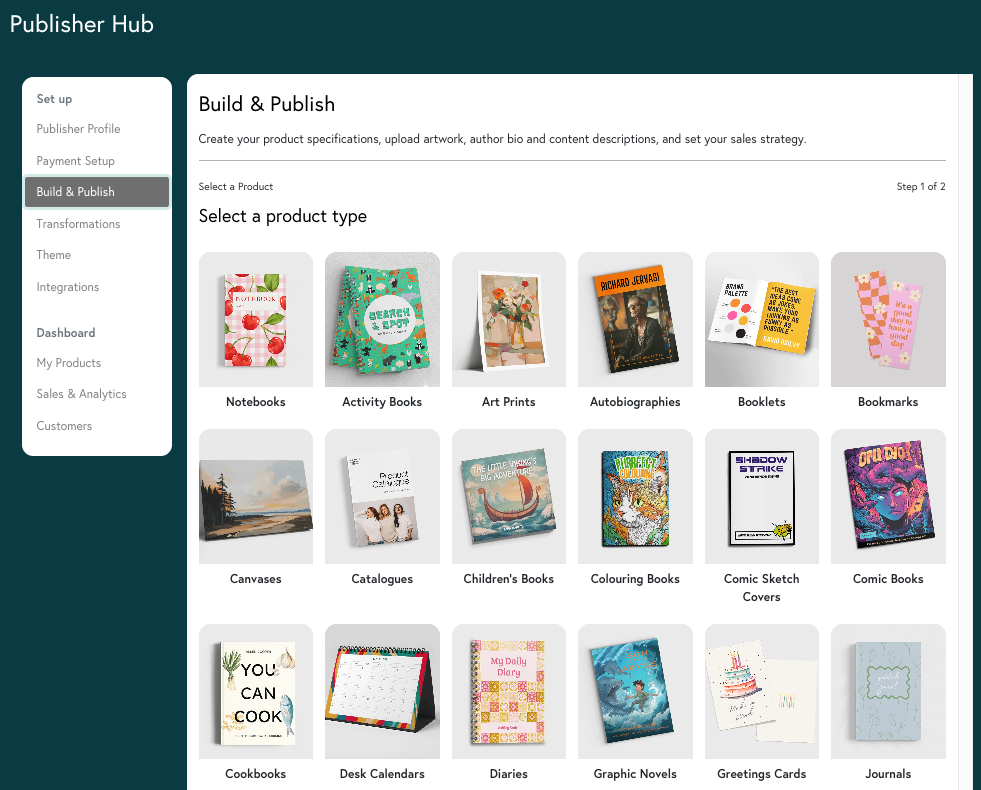
This tab allows you to create brand new POD products.
- Go to your Publisher Hub
- Click the ‘Build & Publish’ tab
- Select a product type
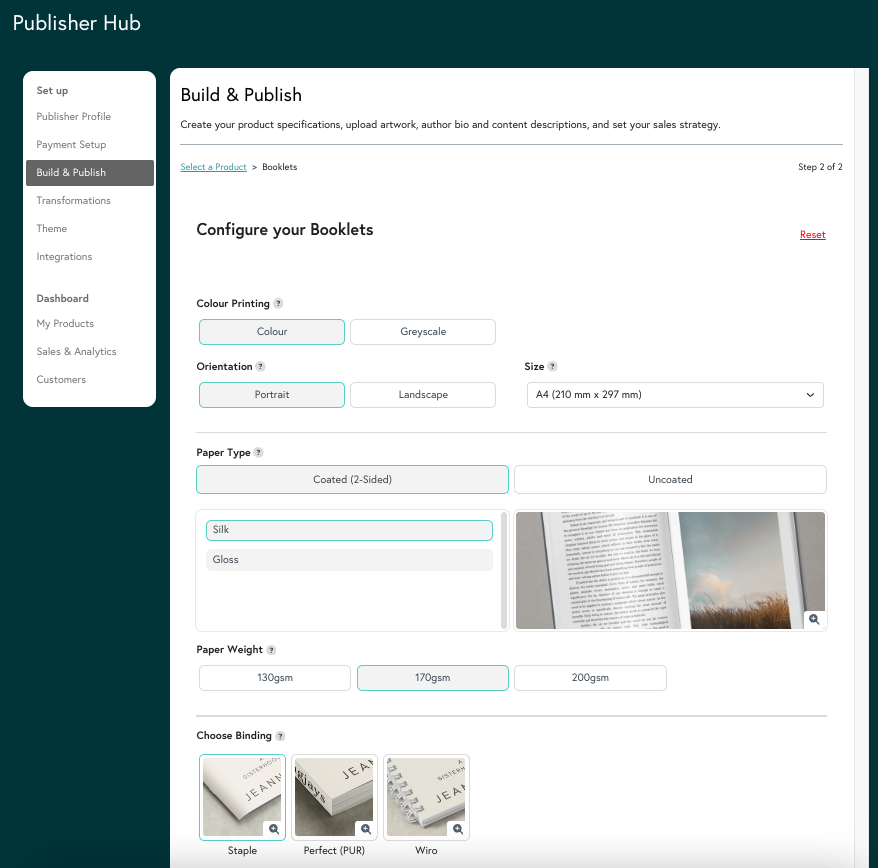
- Choose your material specifications such as size, paper weight, binding, page count and lamination.
- Continue to Product Details
You will be redirected to the Order Manager and prompted to then:
- Upload your artwork
- Complete the Product Details tab by inputting your product listing and author details
- Set your pricing strategy
- Add product genre and label tags
- Review and confirm your product
- Enable selling and select 'Save & Publish' to submit your files for review by a print expert.
Mixam will check if your artwork is print-ready. Once complete, you will receive a notification via email that your product setup has been approved.
Providing you have successfully linked a payout account for your commission earnings, customers can then purchase your product.
Transformations
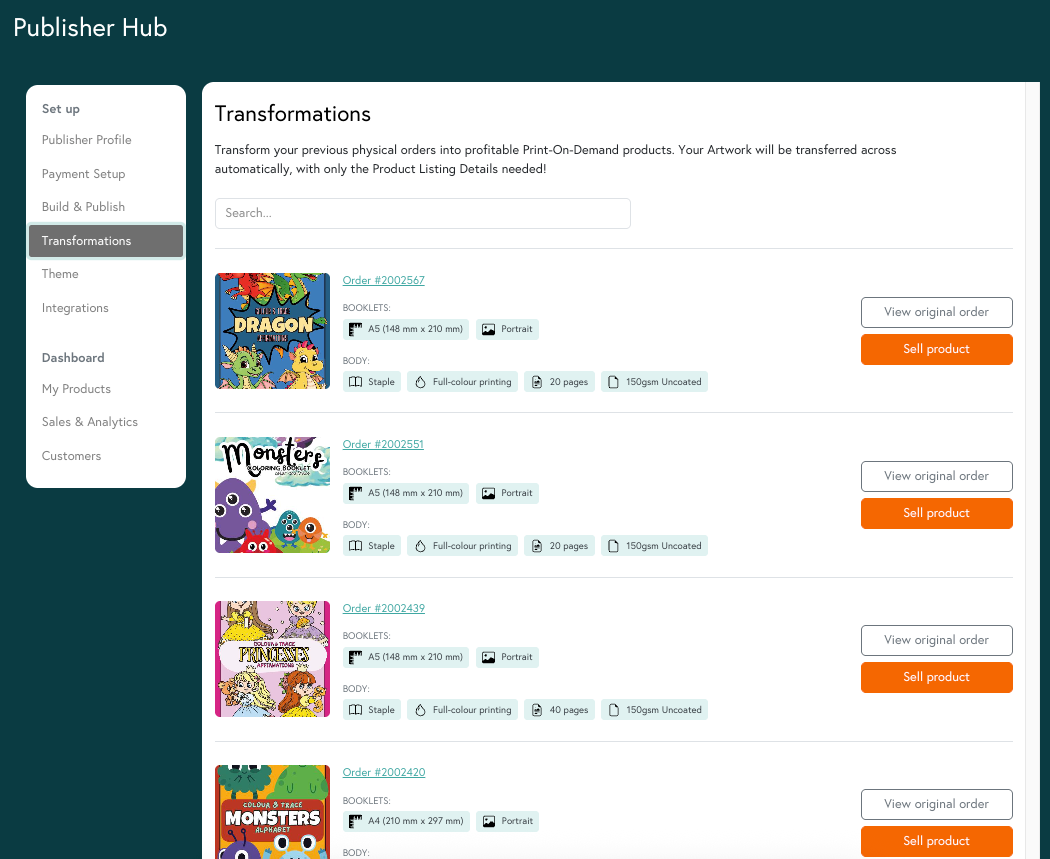
This tab allows you to quickly generate POD products from items you have previously ordered under the same Mixam account. Our system will automatically transfer your product specifications and artwork to the new product, after which you can update your product listing details. After you have selected your specifications and created your artwork, you can make adjustments. Please note that changes to Spine Width, Page Count, Color vs Grayscale printing and Orientation may require adjustments to artwork.
How to transform:
- Go to your Publisher Hub
- Click the ‘Transformations’ tab
- Find the item you want to sell by using the keyword search or scrolling
- Click ‘Sell product’
- Choose from the options presented. We will offer the original specifications and/or alternative specifications that are similar or may enable you to make a greater profit
- Click ‘Create product’
- Select ‘Continue to Product Details’
- Fill in the Product Details Tab. You may also wish to adjust your artwork or product specifications in the Artwork tab.
- Review and confirm your product
- Enable selling and select 'Save & Publish' to submit your files for review by a print expert.
Mixam will check if your artwork is print-ready. Once complete, you will receive a notification via email that your product setup has been approved.
Providing you have successfully linked a payout account for your commission earnings, customers can then purchase your product
If some specifications aren’t available, we’ll offer suitable alternatives of equal print quality, such as different paper weights and finishes or lamination types. Sizes and pagination cannot be changed, but we will provide options to give you the most affordable option.
If a previously ordered product is unsupported for conversion to print on demand, ‘Publishing Unavailable’ will be displayed. This indicates we are currently unable to produce a close match to the product you have selected.
Theme
This section allows you to edit the appearance of your product page and your Publisher Landing Page. The changes you make to one product will apply to every product you enable for purchase. Both tabs will show a preview demonstrating how you and your customers will see an active product page.
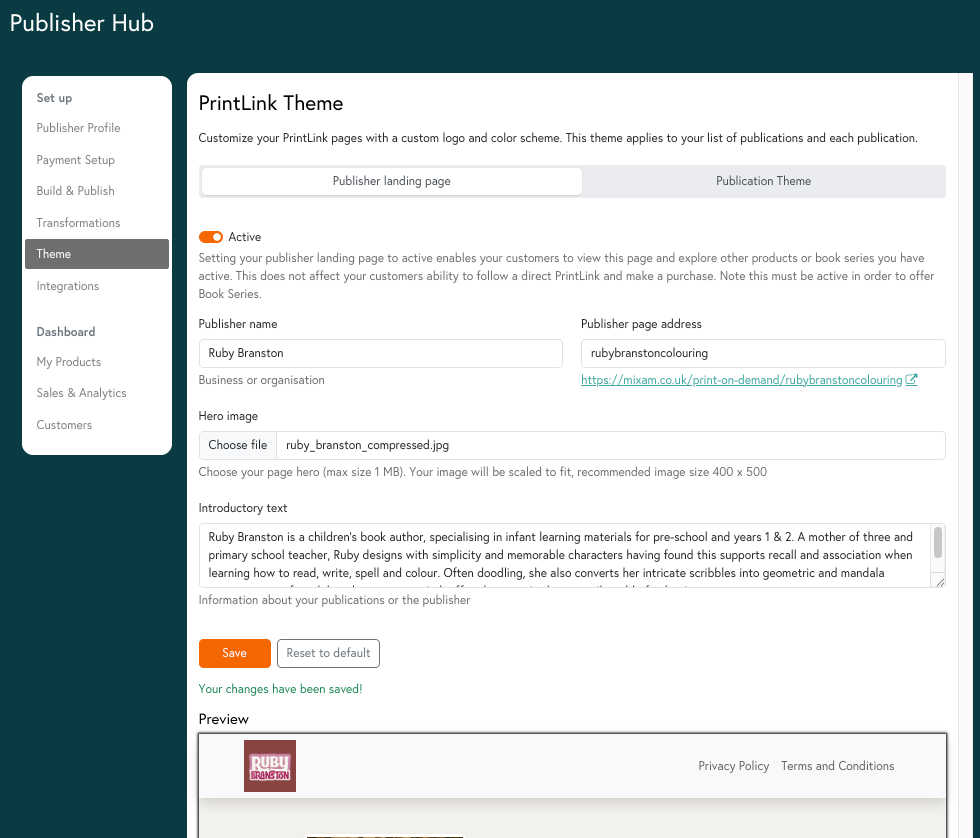
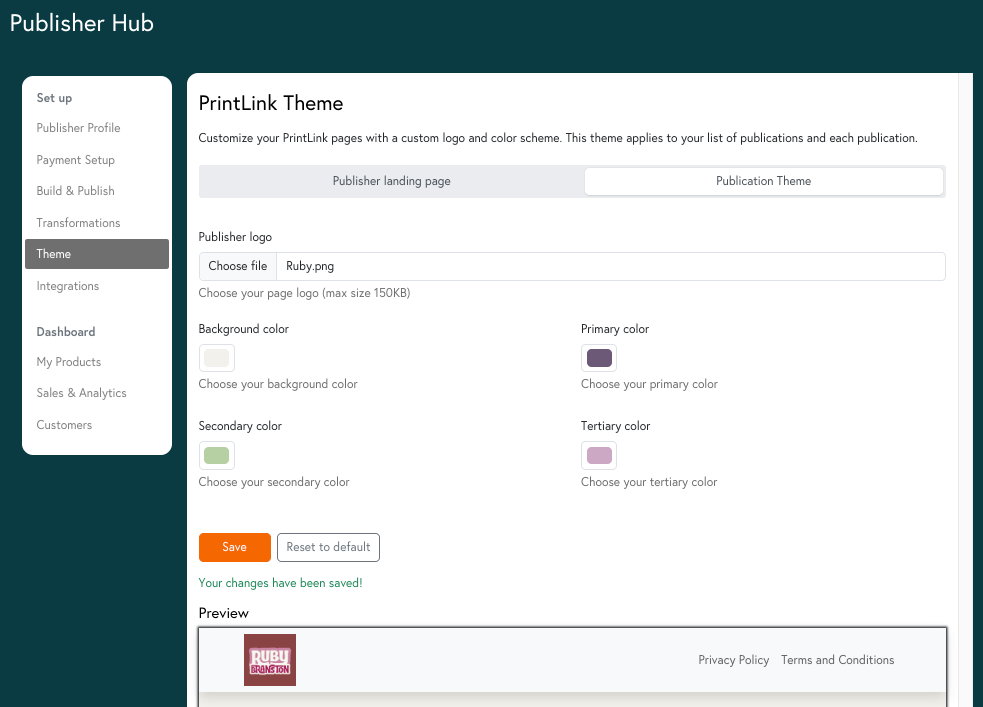
Publisher landing page: This is a webpage that hosts publisher details and showcases all active products you offer in a carousel.
Key Features
- Active: this enables your customers to view your publisher landing page and explore other products or book series you have active. Customers can make direct purchases through an individual PrintLink or by clicking an item on your landing page. Note this must be active in order to offer Book Series.
- Publisher Name: states your publisher name or business. This is the name customers will see when choosing whether to opt in to share their details with you for marketing purposes at checkout.
- Publisher Page Address: you can enter a custom URL for your publisher landing page.
- Hero Image: lets you upload a captivating, high-quality image or logo that represents you or your brand.
- Introductory Text: a field where you can enter product, publisher or collective author and designer information, context about your products and information about available collections and series.
- Product Theme: These are settings that consistently apply to all of your product pages.
Key Features
- Publisher Logo: an upload option that allows you to brand a product page with a high-quality image file.
- Color Styling: allows you to set the color palette for the buttons and background colour on live product pages, such as the price, ‘Add to Cart’ and ‘Buy Now’ button as well as other navigation buttons and warning banners. You can adjust colours using RGB color mode or change the colour’s Hue, Saturation, and Lightness (HSL) values. Alternatively, you can enter a HEX number or use the section’s color picker tool to pinpoint which you’d like displayed.
Integrations
This tab allows you to connect different technologies and platforms, enabling data sharing and automation between systems for improved efficiency and functionality. Simply click an option and follow the on-screen instructions.
Shopify
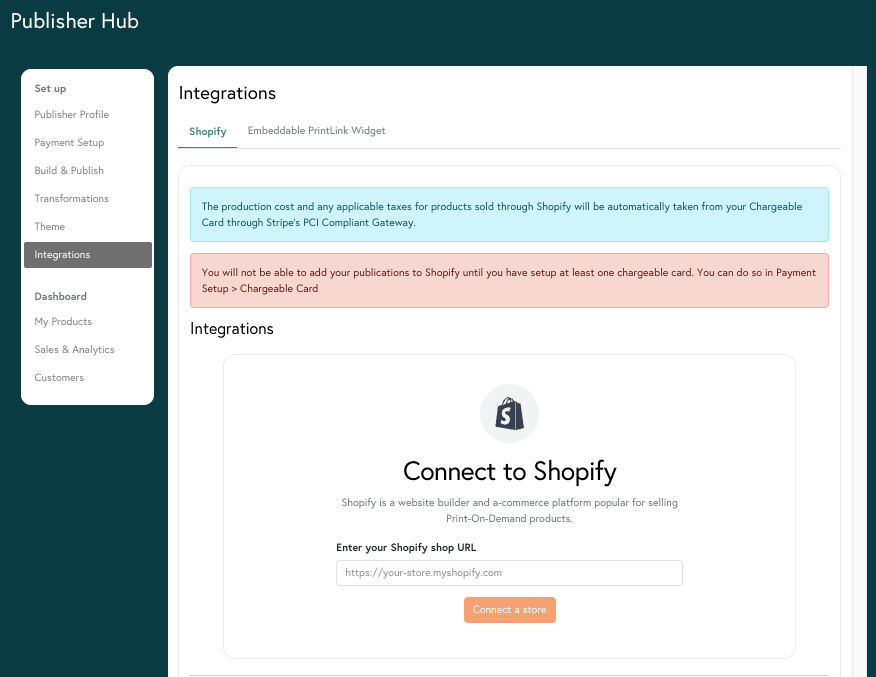
Shopify is a third-party website builder and e-commerce platform popular for selling Print-On-Demand products. Here you can integrate your Shopify Store and add Mixam POD products to it.
How to connect a store:
- Go to your Publisher Hub
- Click the ‘Integrations’ tab
- Click the’ Shopify’ tab
- Paste your Shopify Store URL into the text box and click Connect a Store. You will be redirected to your Shopify Account where you will be prompted to log in to your Mixam Account via the Mixam Print-On-Demand App.
From here you can either continue the process of adding or removing products within the Mixam App in Shopify, or directly from your Mixam Publishing Hub.
To connect additional stores, click Connect another store in the Integrations > Shopify tab in your Publisher Hub. Store connections are unlimited and can support different products.
How to add products
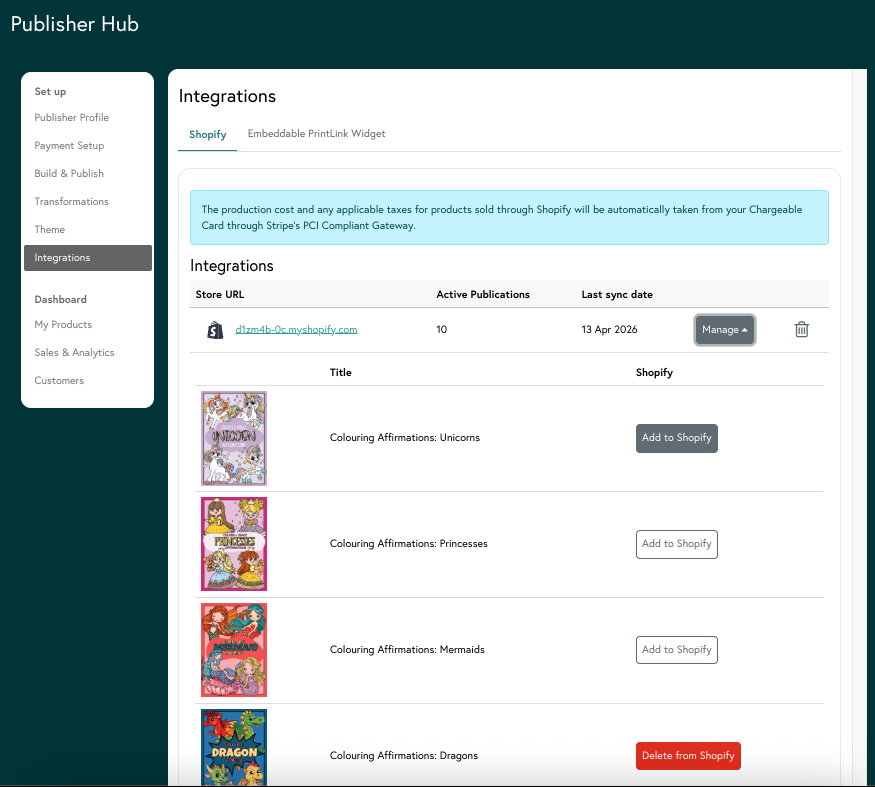
Start in either the Mixam: Print-On-Demand App in your Shopify Store, or Publisher Hub > Integrations > Shopify when logged into Mixam.
- Click ‘Manage’ in the integrations table for the store integration you wish to add or remove products from.
- Find the product you wish to add from the product table.
- Click ‘Add to Shopify’
- Ensure your product is set to Active in your Shopify store and is enabled for your desired sales channels.
Note - only products that are active and have been confirmed by you and approved by Mixam can be added to your Shopify Store.
Embeddable PrintLink Widget
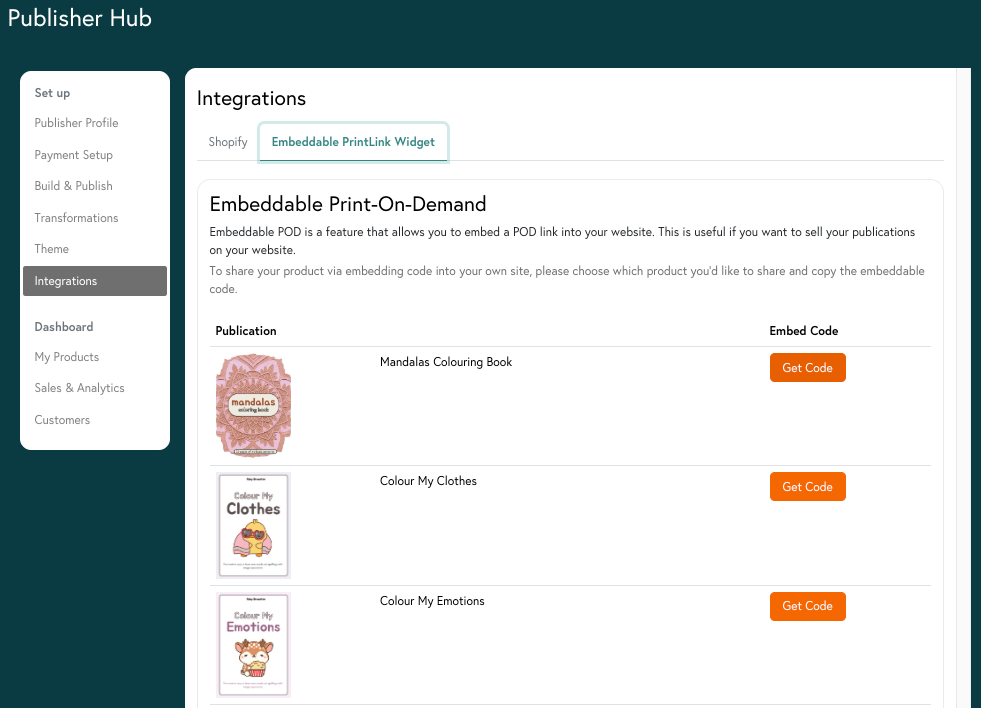
The Embeddable PrintLink widget is a feature that allows you to embed your Print-On-Demand product into your website. This is useful if you want to sell products fulfilled by Mixam directly from your own website.
How to embed:
- Go to your Publisher Hub
- Click the ‘Integrations’ tab
- Click the ‘Embeddable PrintLink widget’ tab
- Locate the product you wish to add to your website. Note - the product must be set to active and in a confirmed and approved state to show in the available list.
- Click ‘Get Code’
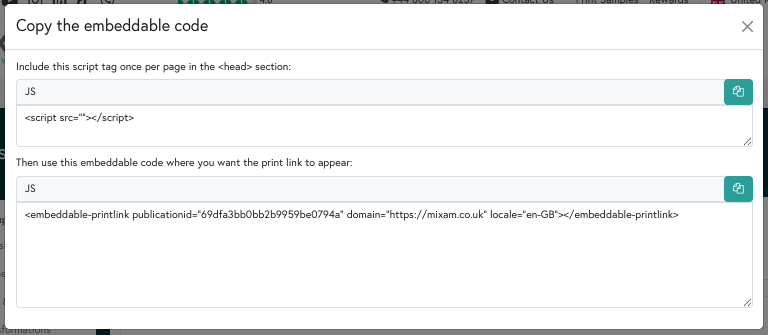
- Copy both the script tag and embeddable code and add it to the relevant area of your website code base. The script tag must be pasted into the header and the embeddable code where you wish the PrintLink to appear.
My Products
All Products
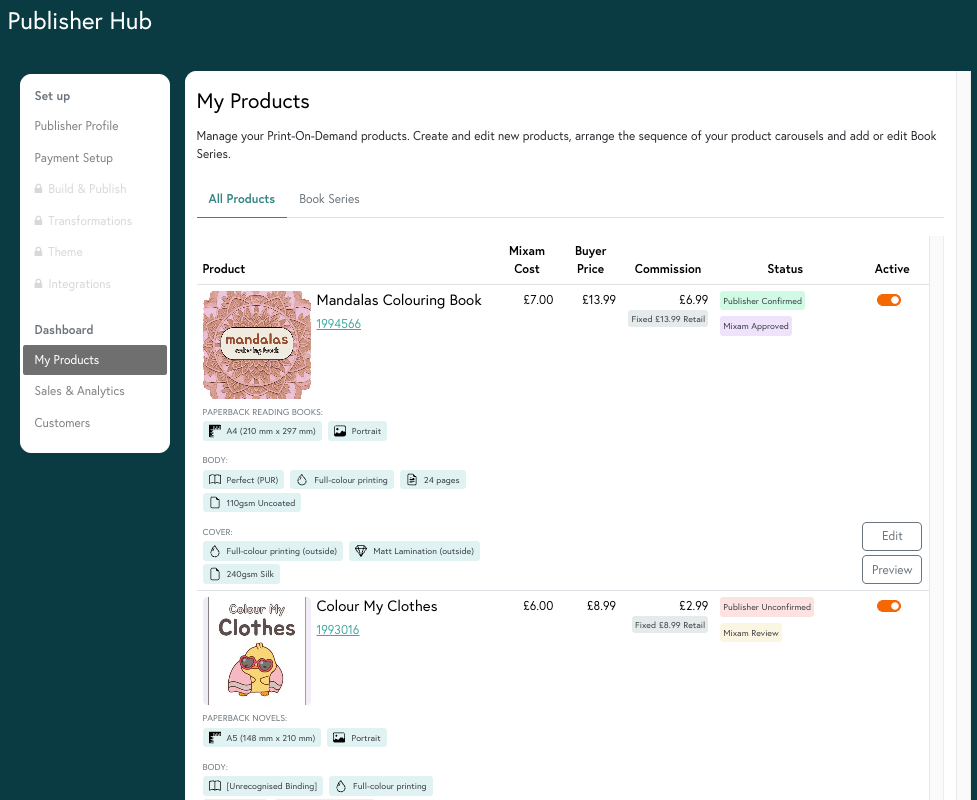
This tab contains every POD product you’ve created. It will display a reference number, print specifications, Mixam’s production cost, your expected commission and pricing strategy, the buyer price, product status and active status.
Key Features
- Mixam Cost: The cost to produce the product, excluding shipping. Updated in real-time.
- Buyer Price: The Mixam Cost plus your commission
- Commission: The commission you have set and the pricing strategy you have selected
- Status: Indicates whether a product can/cannot be set to active. Products must be both confirmed by you and approved by Mixam to enable selling.
- Active: this toggle allows you to switch on a publication for purchasing. When inactive, a customer can still visit your product link but cannot purchase the item.
- Edit: this button directs you to your Artwork, Product Details and pricing strategy. Here you can make adjustments to the content and print specifications.
- Preview: this button opens your PrintLink product page in a new window so you can check how it appears to your customers.
Book Series
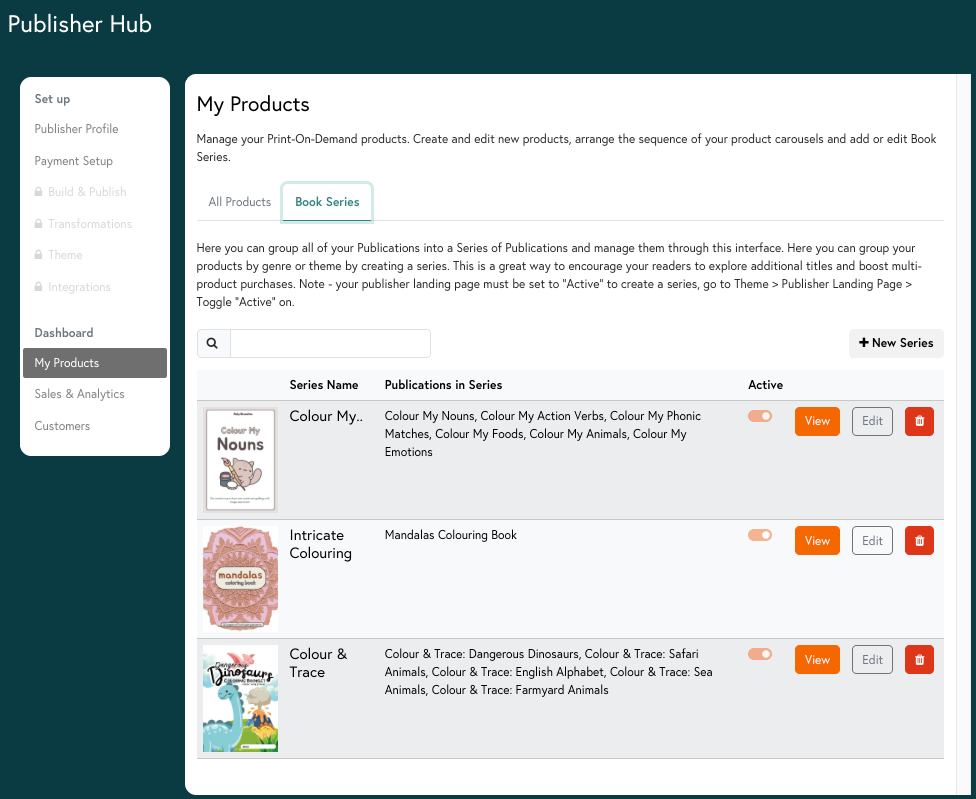
This tab enables you to bundle or group products into a series based on a theme, storyline, or supporting content for your main titles, making it easier for readers to discover and purchase related products. Click the ‘+ New Series’ button and complete the fields in the ‘Add New Series’ section.
*Note - your publisher landing page must be set to "Active" to create a series, go to Theme > Publisher Landing Page > Toggle "Active" on.
Sales & Analytics
Key Features
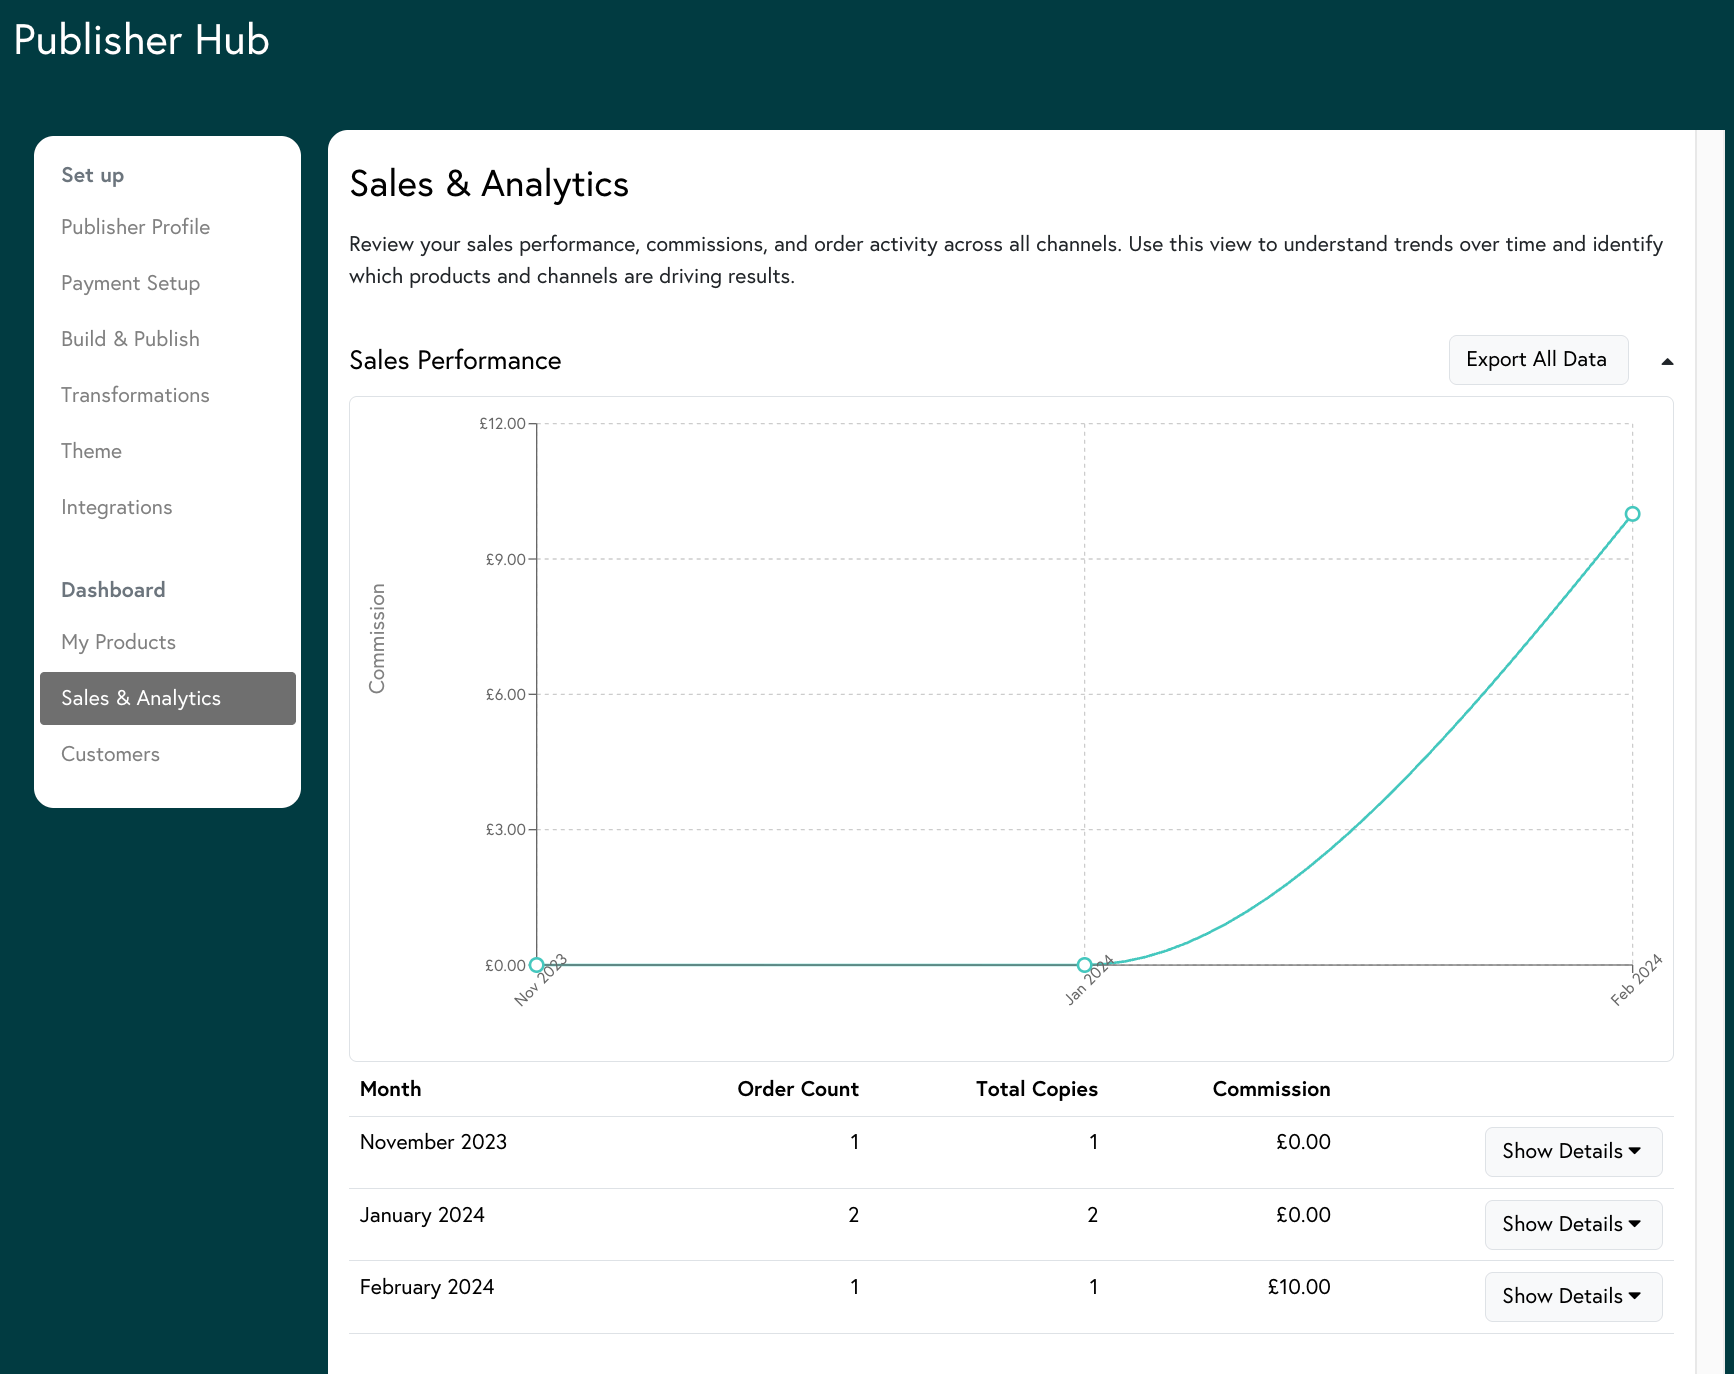
- Sales Performance Graph: a graphic that charts your commissions earned over time.
- Export all data: allows you to download your sales performance data as a .CSV file or Excel spreadsheet.
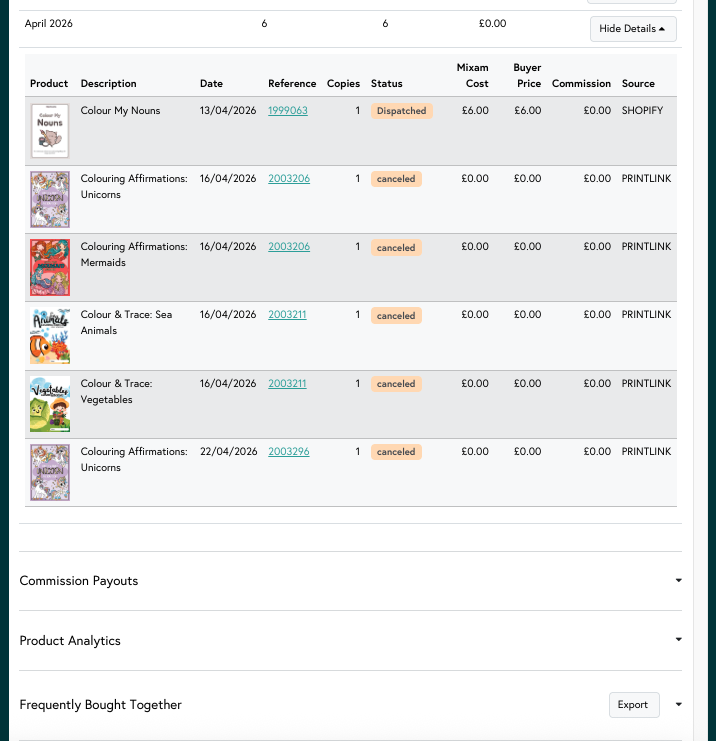
- Monthly Sales list: a summary of the sales received by month with total estimated commission. Note this does not reflect payouts - commissions are paid out the month following and may in some instances be paid early due to the timing of month end and weekends.
- ‘Show Details’ button: details customer orders placed within a month. Customer information is confidential (unless you’ve agreed to the Data Sharing Agreement agreement in the ‘Customers’ section) and only displays a publication thumbnail image, product title, purchase date, reference number, order quantity, order status, Mixam cost, buyer price, expected commission and the source of the sale.
- Commission Payouts: A summary of your historic and future pending payouts generated from your Print-on-Demand Sales. This is a summarised overview of information available in your Stripe Payment Dashboard. Choose what date range of data to export.
- Product Analytics: An overview of your sales by product and sales avenue.
- Frequently Bought Together: Instances of multi-item purchase pairings ranked by the most common combination.
Customers
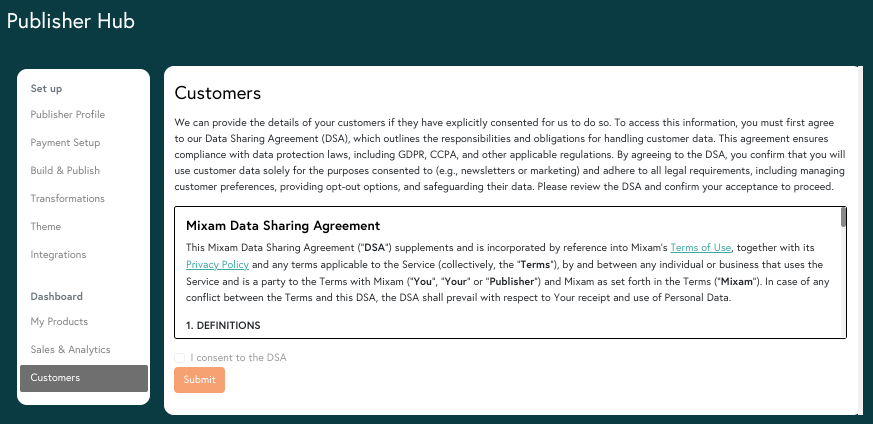
This section allows you to collect your customer's email addresses for marketing purposes only. If you consent to the Data Sharing Agreement (DSA), an email opt-in checkbox will appear at customer checkout so they can choose whether to subscribe. If you do not consent to the DSA, the email opt-in checkbox will not appear. Mixam is not responsible for any legal or contractual issues that may arise if customer information is misused or mishandled.
Consented Customers
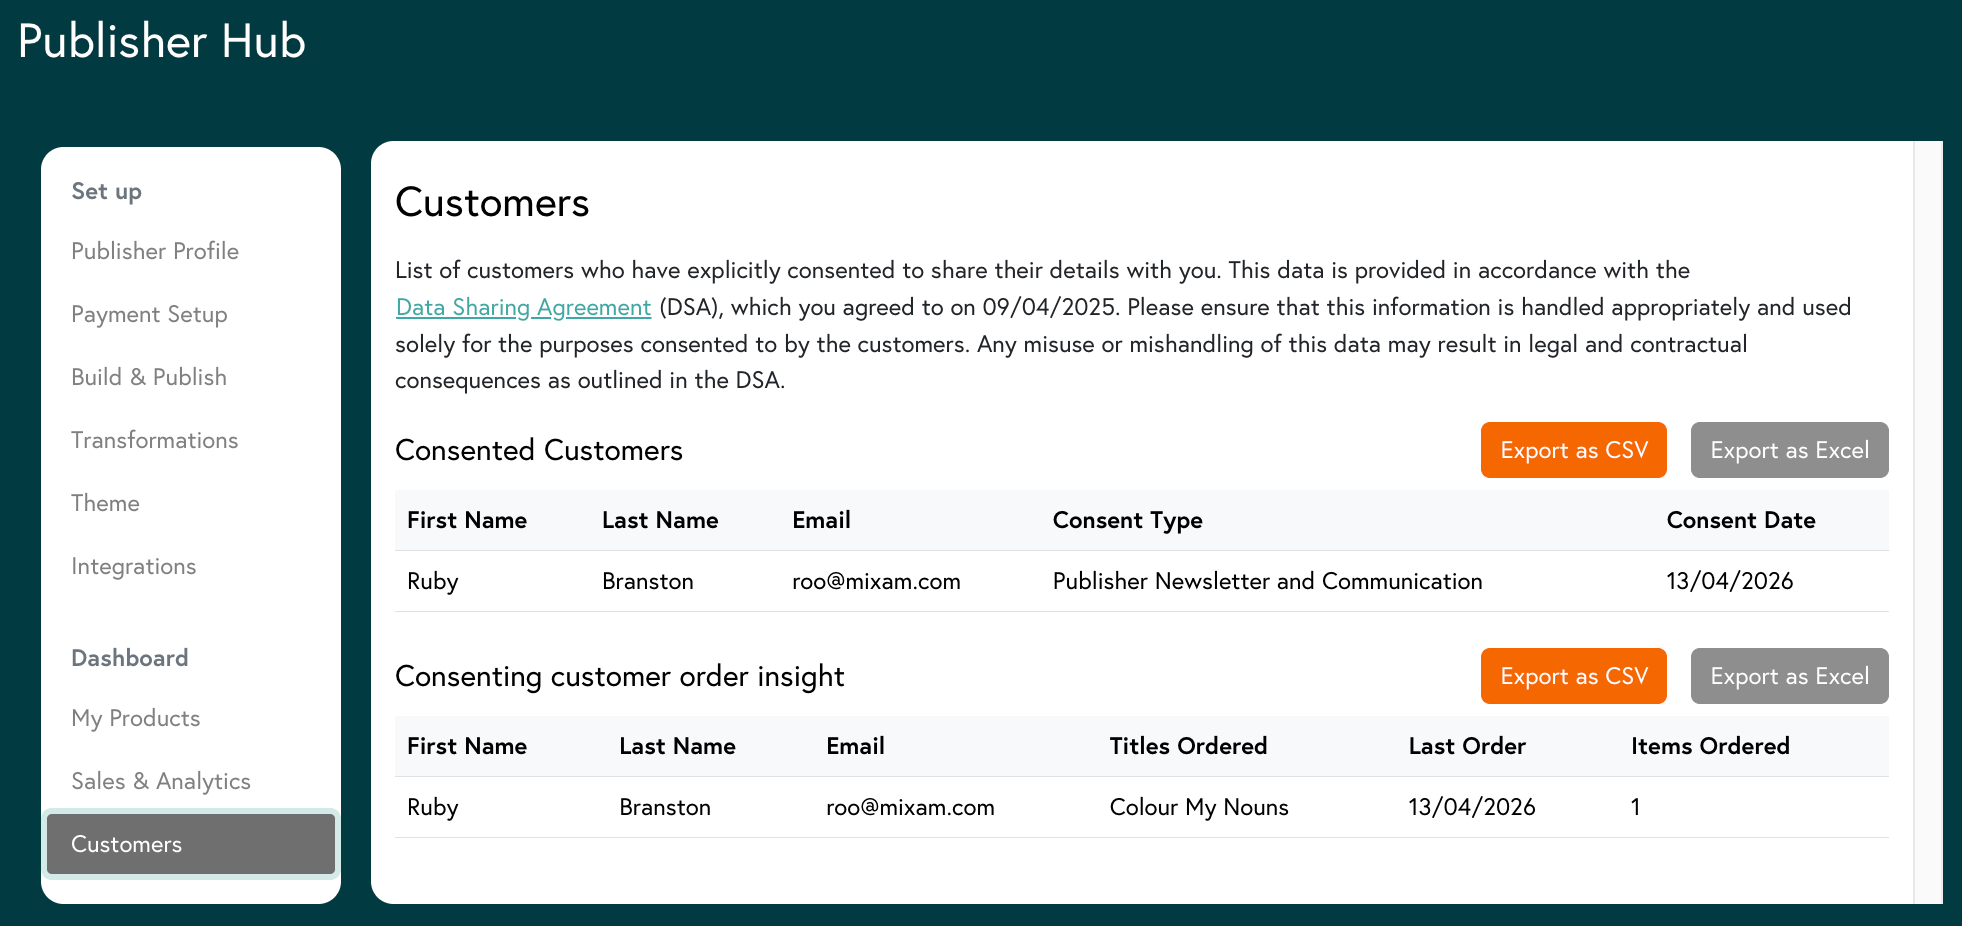
A table will appear when you consent to the DSA agreement and click ‘Submit’. When customers subscribe, the table will display a list containing customers’ first and last names, email addresses, consent type, and date of consent. You can then export the information as a CSV file or Excel spreadsheet and input it into your chosen email marketing platform.
Consenting Customer Order Insight
Providing you have consenting customers, you can view a summary of what items your customers are ordering, their total purchased items and their last order date. This information may assist you in what products you market to them.
Now that you know how to navigate the Publisher Hub tab, you're ready to discover how to start earning from your prints by Getting Paid with Stripe.
